How to Build a Herringbone Deck

Introduction

How to Build a Herringbone Deck in Auckland NZ
Want a deck that stands out from the neighbours’? A herringbone deck pattern can turn your Auckland backyard into a stunning outdoor haven, blending style with strength. In a city where outdoor living is a Kiwi tradition—think barbecues in St Heliers or morning brews in Titirangi—this patterned design adds a touch of elegance to homes from Mount Eden to the North Shore. The herringbone layout not only looks impressive but can boost your property’s value in Auckland’s $1.2 million market, per REINZ 2024 data, by enhancing curb appeal. DIY enthusiasts can tackle this project with intermediate skills, saving costs while enjoying the process. However, the precision required for a flawless herringbone pattern often makes professional help a smart choice, especially for uneven terrain or large decks. My Homes Decking Expert, Auckland’s go-to for custom deck installations, brings expertise to ensure your deck lasts and shines, whether you DIY or delegate.

What Is a Herringbone Deck Pattern?

A herringbone deck pattern is more than just a design—it’s a statement. Here’s what makes it special for Auckland homeowners.

  • Define the herringbone layout and why it’s unique:
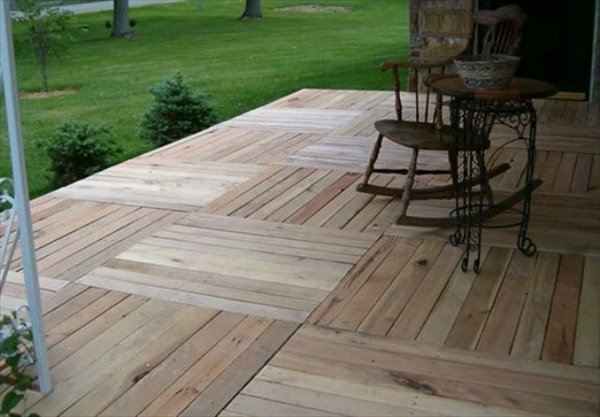
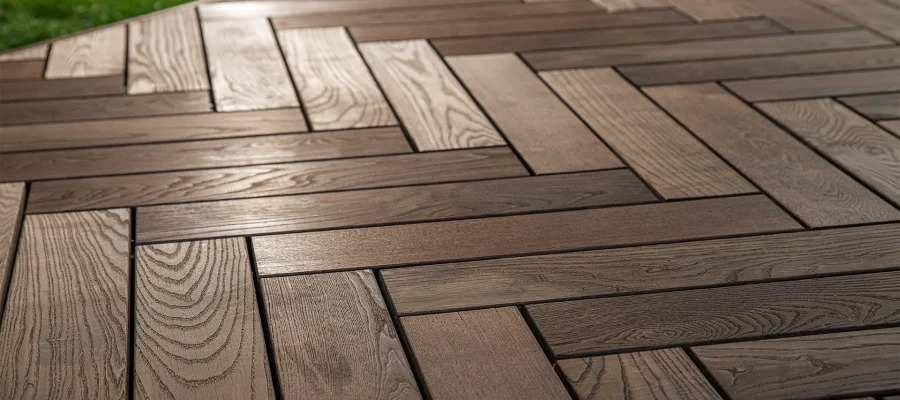
    • The herringbone pattern features rectangular boards arranged in a zigzag, V-shaped layout, resembling the bones of a herring fish, offering a dynamic, eye-catching look perfect for modern Papatoetoe decks.
    • Unlike straight-line patterns, its interlocking design adds visual interest, making it a standout feature in Auckland’s suburban landscapes, per 2024 Houzz NZ trends.
    • This layout works well in small or large spaces, transforming a basic deck into a focal point, ideal for CBD apartment balconies or sprawling North Shore yards.
  • Advantages: symmetry, style, and strength:
    • Symmetry creates a balanced, polished appearance, enhancing the aesthetic of Remuera homes where design matters, per local real estate insights.
    • The interlocking structure adds strength, distributing weight evenly, a practical benefit for family gatherings in Titirangi, per NZ building standards.
    • Style-wise, it elevates your outdoor space, making it a conversation starter during Auckland’s summer barbecues, per community feedback.
  • Difference between chevron and herringbone:
    • Chevron uses V-shaped cuts at the ends of boards for a smoother, uniform look, while herringbone relies on angled joints at board ends, giving a rugged, classic vibe, a distinction noted at the Auckland Home Show 2024.
    • Herringbone’s irregular joins add character, suiting rustic Mount Eden villas, whereas chevron’s clean lines fit sleek Parnell modern builds, offering DIYers a style choice.

Pattern Insight: Picture your deck as a woven masterpiece—herringbone’s unique layout brings texture and depth, perfect for Auckland’s outdoor lifestyle.

Understanding the herringbone pattern helps you appreciate its potential, setting the stage for a rewarding DIY project or a pro build.

Tools & Materials Needed

Building a herringbone deck requires the right gear to ensure precision and durability, tailored for Auckland’s weather. Here’s your checklist:

  • Pressure-treated timber or composite boards:
    • Use H3.2-treated pine, available at Mitre 10 in Henderson ($5–$7 per linear metre), resistant to rot in Auckland’s 1200 mm annual rainfall, per NIWA 2024 data.
    • Opt for composite boards, like Ecowood from Bunnings in Manukau ($50/sqm), made from recycled materials, offering low maintenance for humid St Heliers decks.
  • Joists, saw, tape measure, level, chalk line:
    • Joists (100 x 50 mm H3.2 timber, $6/m at Mitre 10) provide the frame—space them 400 mm apart for stability, per NZ Building Code Clause B1.
    • A mitre saw, rentable from Hirepool in Albany ($40/day), cuts precise angles, essential for herringbone’s 45° layout, a must for Titirangi slopes.
    • A tape measure ($10) and 1200 mm spirit level ($15, Bunnings) ensure accurate measurements, while a chalk line ($8, Mitre 10) marks your pattern, key for CBD precision.
  • Fasteners and screws:
    • Use galvanised or stainless-steel screws (50 mm, $20/100 at Mitre 10) to resist corrosion in Auckland’s coastal air, per NZS 3604 (Timber Framed Buildings).
    • Hidden fasteners, like TigerClaw from Mitre 10 ($30/100), keep the surface clean, enhancing the herringbone’s sleek look in Remuera gardens.
  • Decking spacers, joist hangers:
    • Decking spacers (5 mm, $5/set at Bunnings) maintain consistent gaps, preventing water pooling, a necessity in Papatoetoe’s wet climate, per Clause E3.
    • Joist hangers ($2 each, Mitre 10) secure joists to the frame, ensuring stability on North Shore’s uneven terrain, per local builder standards.

Tool Tip: Invest in a cordless drill ($100, Bunnings) for faster fastening— it’s a game-changer for DIYers tackling large Mount Eden decks.

With these tools and materials, you’re set to craft a herringbone deck that withstands Auckland’s elements and impresses your neighbours.
Thermory_decking_herringbone

Preparing the Foundation

A solid foundation is critical for a herringbone deck, ensuring it supports the pattern’s complexity in Auckland’s varied landscapes. Here’s how to get started:

  • Choose the right decking frame for a herringbone design:
    • Use a rectangular or square frame with joists running perpendicular to the house, ideal for herringbone’s angled layout, a common setup in St Heliers coastal homes, per 2024 design trends.
    • Opt for a double-joist frame where the pattern shifts direction, adding strength, a technique suited for larger Titirangi decks, per NZ building guidelines.
    • Ensure the frame size matches your pattern—typically 3–4 m wide—to allow the herringbone to flow naturally, perfect for CBD apartment extensions.
  • Subframe spacing and blocking techniques for support:
    • Space joists 400 mm apart, with blocking (cross-braces) every 1.2 m, providing mid-span support for the angled boards, a must for Papatoetoe family decks, per Clause B1 (Structure).
    • Install diagonal blocking at 45° angles where the herringbone meets, enhancing stability, a pro tip for uneven Mount Eden terrains, per local builder feedback.
    • Use H3.2-treated timber for blocking ($5/m, Mitre 10), resisting rot in Auckland’s humid summers (70% humidity), per NIWA data.
  • Importance of a level base:
    • A level base prevents boards from rocking or warping, critical in Remuera’s upscale homes where precision matters, per NZS 3604 standards.
    • Use a spirit level and adjust with compacted gravel or concrete pads—uneven ground, common in North Shore slopes, can ruin the pattern, per DIY advice.
    • Check the base every metre—slopes over 1:100 need terracing, ensuring compliance with Clause E1 (Surface Water) for drainage, a key consideration in rainy Auckland.

Foundation Tip: Rent a laser level from Hirepool ($50/day) for large decks—it ensures pinpoint accuracy, saving time on Parnell’s tricky sites.

A strong, level foundation sets the stage for a herringbone deck that’s both beautiful and durable, tailored for Auckland’s unique conditions.

Step-by-Step: How to Build a Herringbone Deck

Building a herringbone deck is a rewarding DIY project for Auckland homeowners with some experience. Follow these steps for a stunning result:

Plan Your Pattern Layout
  • Sketch the herringbone pattern on graph paper, marking the 45° angle, a design trick for modern Papatoetoe decks, per 2024 Auckland Home Show insights.
  • Measure your deck area—aim for a 3 m x 3 m minimum to showcase the pattern, ideal for North Shore gardens, ensuring enough space for symmetry.
  • Decide on board width (90 mm or 140 mm, Mitre 10) to balance detail and coverage, a choice that suits Titirangi’s rustic vibe, per local preferences.
Center the Pattern
  • Mark the deck’s centre with a chalk line, running from corner to corner, creating an X, a precision step for CBD apartment balconies, per DIY standards.
  • Dry lay boards along the centre line at a 45° angle, adjusting until the pattern flows evenly, a visual test for Mount Eden villas, per builder advice.
  • Ensure the centre aligns with key features, like a door or view, enhancing the layout’s impact in St Heliers coastal homes.
Install Blocking Between Joists
  • Add blocking between joists every 1.2 m, cutting H3.2 timber to fit, providing mid-span support, essential for Remuera’s heavy-use decks, per Clause B1.
  • Secure with galvanised screws, ensuring tight fits, preventing board sagging, a common issue in Papatoetoe’s family spaces, per local feedback.
  • Check alignment with a spirit level—uneven blocking can distort the herringbone, a risk on North Shore slopes, per NZS 3604 guidelines.
Mark a Center Line and Begin Laying Boards
  • Snap a chalk line along the centre at 45°, guiding your first row, a critical step for Parnell’s precision-driven builds, per 2024 trends.
  • Lay the first two boards, meeting at the centre point, using spacers (5 mm) for even gaps, ensuring drainage in Auckland’s 1200 mm rainfall, per Clause E3.
  • Fasten with hidden clips or screws, keeping the surface clean, a pro technique for modern CBD decks, per My Homes Decking Expert tips.
Cut Boards Precisely at Angles
  • Use a mitre saw to cut boards at 45°, matching the herringbone angle, a must for Titirangi’s detailed patterns, per DIY best practices.
  • Measure each cut individually—standard lengths won’t fit perfectly, a precision need for Mount Eden’s older layouts, per local builder insights.
  • Test cuts dry before securing, avoiding waste, a smart move for St Heliers’ coastal projects, per 2024 sustainability trends.
Secure Boards Symmetrically
  • Fasten boards with screws every 400 mm, maintaining symmetry, a key step for Remuera’s upscale decks, per NZ building standards.
  • Use a consistent pattern—alternate screw placement to avoid splitting, a technique for Papatoetoe family decks, per local advice.
  • Check alignment with the chalk line after every row, ensuring the zigzag flows, a detail for North Shore’s visible layouts, per My Homes expertise.
Trim and Finish Edges
  • Cut excess boards with a jigsaw, creating a clean edge, a finishing touch for CBD apartment decks, per 2024 design trends.
  • Add border boards or picture framing with straight-cut timber, enhancing the herringbone, a style choice for Parnell heritage homes, per Houzz NZ.
  • Sand edges and apply a low-VOC sealant (Resene Woodsman, $80/4L) for weather resistance, a must in Auckland’s humid climate, per Clause E2.

Step Tip: Work in sections—complete one quadrant before moving on, keeping the pattern aligned, a time-saver for large Titirangi builds.

These steps guide you through crafting a herringbone deck, blending Auckland’s outdoor charm with professional-grade results.

Common Mistakes to Avoid

Even experienced DIYers can stumble with a herringbone deck. Avoid these pitfalls to ensure success in Auckland:

  • Skipping blocking:
    • Omitting mid-span blocking causes boards to sag, a risk in Papatoetoe’s heavy-use decks, leading to costly repairs, per NZ Building Code Clause B1, a lesson from local builders.
    • Install blocking every 1.2 m—skipping it weakens the pattern, especially on North Shore slopes, per My Homes Decking Expert feedback.
  • Failing to pre-plan layout:
    • Jumping in without a dry layout results in uneven angles, a common error in Mount Eden villas, disrupting the herringbone’s flow, per 2024 DIY trends.
    • Plan on paper and test with boards—poor planning wastes time and materials, a pitfall for CBD apartment projects, per local advice.
  • Cutting all boards before checking fit:
    • Pre-cutting without testing leads to mismatches, a mistake in St Heliers’ coastal decks where angles shift with terrain, per builder insights.
    • Cut boards row-by-row, adjusting as you go, ensuring precision, a pro tip for Remuera’s detailed designs, per My Homes expertise.

Mistake Tip: Take photos of each step— it helps spot errors early and tracks your progress, a handy trick for Titirangi’s complex builds.

Avoiding these mistakes keeps your herringbone deck on track, delivering a polished look for your Auckland home.

When to Hire a Professional Deck Builder in Auckland

While DIY is rewarding, some herringbone deck projects need expert hands, especially in Auckland’s challenging conditions. Here’s when to call in the pros:

  • Uneven terrain or slopes:
    • Sloped sites, common in Titirangi, require terracing and precise levelling, tasks needing a builder’s expertise, per NZS 3604 standards, to avoid structural issues.
    • Professionals adjust joist heights and blocking, ensuring the herringbone pattern aligns, a challenge for Mount Eden’s hilly backyards, per local feedback.
    • My Homes Decking Expert handles uneven terrain, delivering a stable deck, a key service for North Shore homeowners, per their 10-year experience.
  • Large decks or complex layouts:
    • Decks over 20 sqm or multi-level designs, like those in Remuera, need coordinated trades and permits, per Auckland Unitary Plan rules, beyond DIY scope.
    • Complex patterns with borders or picture framing demand precision, a specialty for Papatoetoe family decks, where pros ensure consistency, per 2024 trends.
    • My Homes Decking Expert manages large builds, ensuring compliance and quality, a trusted choice for CBD apartment extensions, per client reviews.
  • Want a polished, long-lasting result:
    • A professional finish, free of gaps or warping, boosts resale value in Auckland’s $1.2 million market, per REINZ 2024 data, a goal for St Heliers coastal homes.
    • Experts use weather-resistant materials and techniques, ensuring longevity in Auckland’s 1200 mm rainfall, per Clause E3, a must for Parnell heritage decks.
    • My Homes Decking Expert offers a 10-year warranty, guaranteeing a durable, stylish deck, a premium service for Auckland’s discerning homeowners, per their expertise.

Pro Tip: Request a free site visit—My Homes Decking Expert can assess your space and suggest custom solutions, saving you from DIY headaches.

Hiring pros ensures your herringbone deck meets Auckland’s standards, delivering a masterpiece tailored to your home.

FAQs About Building a Herringbone Deck

Can a beginner build a herringbone deck?
Not recommended—beginners may struggle with the precision of angles and layout. Intermediate DIYers with tool experience can try, but pros like My Homes Decking Expert are best for flawless results in Auckland.

What’s the ideal angle for a herringbone deck pattern?
A 45° angle is standard, creating a balanced zigzag, ideal for Auckland decks. Adjust to 30° or 60° for a unique look, but test the layout first, per local design trends.

How do I maintain a patterned deck in Auckland’s weather?
Clean with eco-friendly soap annually, apply low-VOC sealant (Resene Woodsman) every 2 years, and ensure drainage with 5 mm spacers, protecting against Auckland’s 1200 mm rainfall, per Clause E3.

What’s the cost to build a herringbone deck?
DIY costs $2,000–$4,000 for a 20 sqm deck (materials and tools), while professional builds by My Homes Decking Expert range from $5,000–$10,000, depending on size and complexity, per 2024 Builderscrack data.

Can I use composite boards for a herringbone deck?
Yes, composite like Ecowood ($50/sqm) works well, offering durability and low maintenance, perfect for Auckland’s humid climate, but requires precise cutting, a task for experienced DIYers or pros.

Conclusion

A herringbone deck transforms a basic outdoor area into a design-forward masterpiece, adding style, usability, and value to your Auckland home. Whether you’re sipping coffee in Mount Eden or hosting a barbecue in St Heliers, this pattern turns your deck into a standout feature, boosting your property’s appeal in the $1.2 million market, per REINZ 2024. This guide has equipped you with steps to plan, lay, and finish a herringbone deck, tailored for DIY-savvy homeowners with intermediate skills. However, the precision and planning required—especially on uneven terrain or large layouts—often make professional help worthwhile. My Homes Decking Expert brings Auckland’s best decking expertise, ensuring a polished, long-lasting result with custom designs and a 10-year warranty. Ready to start? Dive into your DIY project or let the pros handle it.

📞 Contact Auckland’s Decking Experts
My Homes Decking Expert
📞 Call: 022 315 8987
📧 Email: info@myhomesconstruct.co.nz

From custom patterns to full outdoor living builds—we’re Auckland’s decking pros!

Contact us today for a free consultation and turn your deck vision into reality!

Facebook
Twitter
LinkedIn
WhatsApp

Read More Blog's

How to Stain a Deck in 2025: A Detailed Guide
26Mar

How to Stain a Deck in…

How to Stain a Deck in 2025: A Step-by-Step Guide for a Professional Finish Introduction…

How to Remove Deck Stain: The Ultimate Guide For Auckland Homeowners
28Mar

How to Remove Deck Stain: The…

How to Remove Deck Stain: A Detailed Guide for Auckland Homeowners Introduction Is your deck…

How to Maximize Space on Your Auckland Deck: Smart Design Ideas
09May

How to Maximize Space on Your…

How to Maximize Space on Your Auckland Deck Introduction Love your deck but wish it…