How to Build a Deck Bench

Introduction

Adding a built-in bench to your deck is a fantastic way to elevate your outdoor space, creating a cozy spot for relaxation, entertaining, or soaking up Auckland’s summer sunshine. Whether you’re in a coastal suburb like St Heliers or a hilly area like Titirangi, a deck bench can transform your deck into a functional and stylish haven, perfect for barbecues or morning coffees with a view of the Waitemata Harbour. Built-in benches offer a seamless look compared to freestanding ones, saving space and adding value to your property in Auckland’s competitive housing market. For DIY enthusiasts, building a deck bench is a rewarding weekend project that can be done with basic tools and some planning. However, if your deck is on uneven terrain or you’re aiming for a complex design, professional help might be the better choice to ensure safety and compliance with local regulations. In this guide, we’ll walk you through the process of building a deck bench step by step, share design and safety tips, and explain why My Homes Construct Ltd is Auckland’s go-to expert for decking projects when you need a pro.

Planning Your Deck Bench

Before you start building, careful planning ensures your deck bench is functional, safe, and fits seamlessly into your outdoor space. Here’s how to plan your deck bench for an Auckland home, considering local conditions and regulations.

  • Choosing bench location (edge, corner, railing-side):
    • Decide where the bench will go based on your deck’s layout and how you use the space. Placing it along the edge or railing-side maximizes floor space, ideal for smaller decks in Mount Eden apartments.
    • Corner benches are great for creating a cozy nook, perfect for larger decks in Remuera where you might want a dedicated seating area for gatherings.
    • Ensure the bench doesn’t block pathways or access to stairs, especially on elevated decks in Titirangi, where safety is key due to steep sections.
    • Consider the view—position the bench to face a scenic spot, like the Hauraki Gulf for North Shore homes, or your garden for a peaceful retreat in Papatoetoe.
    • Check sun exposure— Auckland’s summer sun can be intense, so a shaded spot under a pergola or near a tree might be more comfortable for year-round use.
  • Bench height and depth best practices:
    • The ideal seat height for a deck bench is 400–450 mm (16–18 inches), similar to a standard chair, ensuring comfort for most adults. This height works well for Auckland homeowners looking for a relaxed seating option.
    • Seat depth should be 400–500 mm (16–20 inches) to allow for comfortable sitting without feeling cramped, leaving enough room for cushions if desired.
    • If adding a backrest, aim for a height of 350–450 mm (14–18 inches) above the seat, providing good back support without obstructing the view, a key consideration for decks with scenic outlooks in the Waitakere Ranges.
    • For benches with armrests, keep them at 200–250 mm (8–10 inches) above the seat for ergonomic support, enhancing comfort during long gatherings.
    • Test the dimensions by sitting on a chair or bench of similar size to ensure it feels right before building, ensuring a practical design for everyday use.
  • Building codes or consent (NZ-specific if applicable):
    • Under Schedule 1 of the Building Act 2004, adding a bench to an existing deck typically doesn’t require a building consent if it’s under 1.5m high and doesn’t alter the deck’s structure significantly.
    • However, if the bench is part of a larger deck modification or exceeds site coverage limits under the Auckland Unitary Plan (e.g., in heritage areas like Parnell), a resource consent may be needed—check with Auckland Council to confirm.
    • Ensure the bench doesn’t compromise the deck’s balustrade height—if the bench raises the effective deck height above 1m, a balustrade of at least 1m high is required, per NZ Building Code Clause F4 (Safety from Falling).
    • If fastening the bench to the deck’s joists, ensure the deck’s structural integrity can handle the added load, meeting NZS 3604 (Timber Framed Buildings) standards for live loads (2.0 kPa).
    • For decks on steep sections in Titirangi, consult a professional to ensure the bench doesn’t affect the deck’s stability, especially if it’s elevated or near a boundary.

Planning Tip: Sketch your bench design on graph paper, noting dimensions and placement, to visualize how it fits on your deck and ensure you have enough materials before starting.

Proper planning sets the foundation for a deck bench that’s comfortable, safe, and tailored to your Auckland home, ensuring a seamless addition to your outdoor space.

Materials & Tools You’ll Need

Gathering the right materials and tools is key to building a sturdy, long-lasting deck bench. This list is tailored for Auckland’s climate and building standards, ensuring your bench withstands local weather conditions. Here’s what you’ll need for a standard 2m-long bench:

  • Timber (treated pine, kwila, or composite decking):
    • Pressure-treated pine (H3.2 rating) for the frame, seat, and backrest—affordable and durable in Auckland’s wet climate. For a 2m bench, you’ll need 4–5 boards (90 mm x 40 mm) for the frame and 6–8 boards (90 mm x 19 mm) for the seat and backrest.
    • Alternatively, use kwila hardwood for a premium, rot-resistant option with a rich finish, ideal for upscale homes in Remuera. It’s more expensive but lasts 20–30 years with minimal maintenance.
    • Composite decking is another option—low-maintenance and weather-resistant, perfect for coastal areas like St Heliers where salty air can accelerate timber wear. Ensure it meets NZS 3604 standards for structural use.
    • Choose timber that matches your existing deck for a cohesive look, ensuring a seamless integration into your outdoor space.
  • Screws, brackets, measuring tape, saw, drill:
    • Galvanised or stainless steel decking screws (50 mm and 75 mm lengths) to secure the frame, seat, and backrest, preventing rust in Auckland’s humid, salty air. You’ll need about 50–70 screws for a 2m bench.
    • Galvanised angle brackets (50 mm x 50 mm) to reinforce the frame corners and legs, ensuring stability, especially for benches attached to joists, per NZS 1170.1 (Structural Design Actions).
    • A measuring tape and pencil for marking out the bench layout and cutting timber to size, ensuring accurate dimensions for a professional finish.
    • A handsaw or circular saw to cut timber boards, legs, and supports to the required lengths, allowing for precise fits and adjustments.
    • A cordless drill with 3–5 mm bits for pre-drilling screw holes and driving screws into the timber, reducing the risk of splitting, especially with treated pine.
  • Level and safety gear:
    • A spirit level (or laser level) to ensure the bench is flat and even, preventing wobbling or discomfort, a key consideration for decks on uneven ground in Titirangi.
    • Safety gloves to protect your hands from splinters and sharp tools, essential when handling treated timber, which can be rough.
    • Eye protection (safety goggles) to shield your eyes from sawdust and debris while cutting or drilling, a must for any Auckland DIY project.
    • Ear protection if using power tools like a circular saw, and non-slip work boots to ensure stability on potentially wet or uneven deck surfaces.
  • Additional materials and tools:
    • Sandpaper (120–150 grit): To smooth the timber surfaces, removing rough edges and preparing the bench for staining or sealing, ensuring a safe, splinter-free finish.
    • Wood stain or sealant: A weatherproof stain or sealant (e.g., Resene Woodsman) to protect the timber from Auckland’s UV rays and rainfall, extending its lifespan.
    • Square: To ensure the bench frame is perfectly square, maintaining structural integrity and ensuring a balanced, stable seat.
    • Clamps (optional): To hold timber pieces in place while assembling the frame, making it easier to secure screws accurately, especially if working alone.

Material Tip: Check your timber for warping or knots before cutting—straight, high-quality timber ensures a stronger, more stable bench, saving you time and effort during construction.

With these materials and tools ready, you’ll be well-equipped to build a deck bench that’s sturdy, stylish, and built to last in Auckland’s unique environment.

Step-by-Step: How to Build a Deck Bench

Building a deck bench is a straightforward DIY project if you follow these steps carefully. This guide is designed for Auckland homeowners, factoring in local weather, terrain, and building standards. We’ll build a 2m-long bench with a backrest, suitable for most decks.

1. Measure & Mark Bench Layout

Accurate measurements ensure your bench fits perfectly on your deck, providing a comfortable and stable seating area.

  • Measure the area where the bench will go—along the deck edge, corner, or railing-side. For a 2m-long bench, mark a 2m length on your deck using a measuring tape and pencil, ensuring it doesn’t block pathways or stairs.
  • Mark the bench’s depth—400–500 mm is ideal for comfortable seating. For a 450 mm deep bench, measure 450 mm out from the deck edge or railing at both ends and connect the marks with a straight line.
  • If attaching the bench to the deck’s joists (recommended for stability), locate the joists beneath the deck boards using a stud finder or by tapping to find solid spots, typically spaced 400–450 mm apart, per NZS 3604.
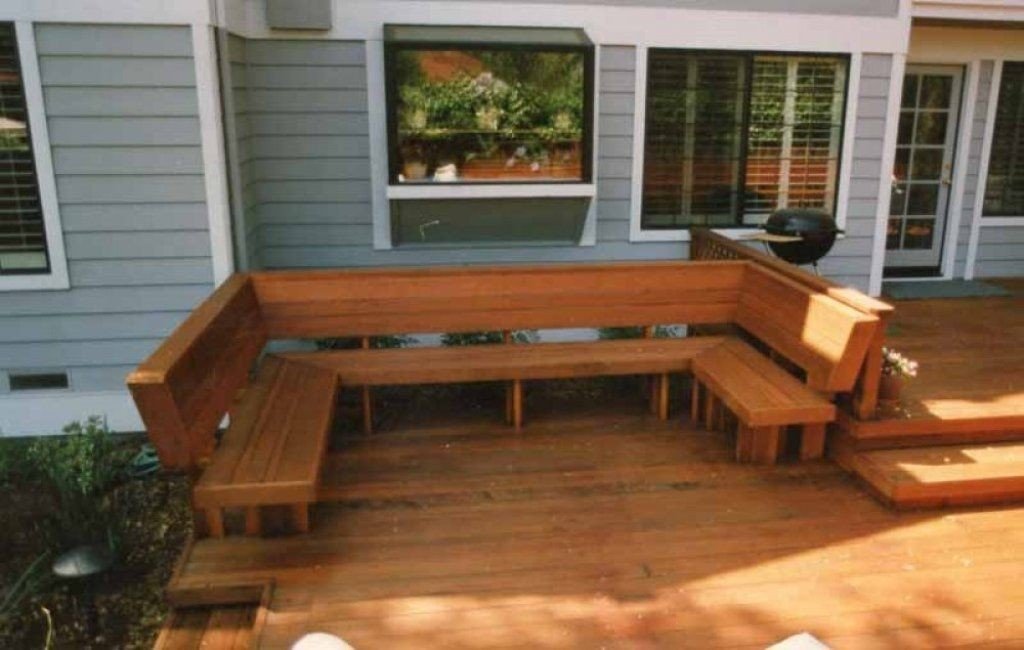
  • For a corner bench in a Remuera backyard, mark two perpendicular sections (e.g., 2m along one side, 1m along the other), ensuring the angle is 90 degrees using a square to maintain a neat, professional look.
  • Double-check your measurements and ensure the bench won’t interfere with balustrades or access points, meeting NZ Building Code Clause F4 requirements for safety.

Layout Tip: Use chalk to mark the layout directly on the deck—it’s easy to wipe off and helps visualize the bench’s footprint before cutting any timber.

2. Build the Frame (Base & Backrest)

The frame forms the structural foundation of your bench, providing support for the seat and backrest, ensuring durability and comfort.

  • Cut two 2m-long pieces of timber (90 mm x 40 mm) for the front and back of the seat frame, and two 410 mm pieces (accounting for the timber’s thickness) for the sides, creating a 2m x 450 mm rectangle.
  • Assemble the seat frame by laying the pieces on a flat surface, ensuring the corners are square using a square tool. Secure each corner with galvanised angle brackets and 50 mm screws, pre-drilling holes to prevent splitting.
  • For the backrest frame, cut two 2m-long pieces for the top and bottom, and three 350 mm pieces for vertical supports—one at each end and one in the middle. Assemble using angle brackets, ensuring the supports are evenly spaced (1m apart).
  • Attach the backrest frame to the seat frame at a slight angle (10–15 degrees) for comfort—secure the bottom of the backrest frame to the back of the seat frame using screws and brackets, creating a sturdy, unified structure.
  • Test the frame by placing it on the deck—ensure it sits flat and doesn’t wobble, adjusting the brackets or screws if needed to maintain stability, especially on uneven decks in Titirangi.

Frame Tip: Clamp the timber pieces together while assembling the frame to keep them aligned, ensuring a tight, secure fit that can handle the bench’s weight and use.

3. Attach Legs Securely to Joists or Deck Boards

The legs provide support and stability, ensuring the bench is safely anchored to your deck, even in Auckland’s windy conditions.

  • Cut four legs (90 mm x 40 mm) to 360 mm long, accounting for the seat frame’s height (40 mm) to achieve a total seat height of 400 mm, a comfortable standard for most users.
  • Attach two legs to each end of the seat frame, positioning them inside the frame for a cleaner look. Secure each leg with two 75 mm screws through the frame into the leg, pre-drilling to prevent splitting.
  • If attaching to the deck’s joists (recommended), position the bench over the marked joists and secure each leg to a joist using 75 mm screws or angle brackets, ensuring a strong connection that meets NZS 1170.1 load requirements (2.0 kPa).
  • For decks without accessible joists, like some in Mount Eden, secure the legs directly to the deck boards using 75 mm screws, ensuring they penetrate at least 40 mm into the deck for a firm hold.
  • Check the bench’s stability by pressing down on each end—it should feel solid with no wobbling, ensuring it can safely support multiple people during gatherings.

Attachment Tip: Use a spirit level to ensure the legs are plumb (vertical), preventing the bench from leaning or tipping, especially on sloped decks in the Waitakere Ranges.

4. Install Seat Boards & Backrest

The seat and backrest boards create the finished surface of your bench, providing comfort and a polished look for your deck.

  • Cut six seat boards (90 mm x 19 mm) to 2m long to match the frame’s length. Lay them across the seat frame, leaving a 3–5 mm gap between each board for drainage, preventing water buildup in Auckland’s wet climate.
  • Secure each seat board to the frame with two 50 mm screws at each end and two in the middle, driving them into the frame’s front, back, and middle supports, pre-drilling to avoid splitting the timber.
  • For the backrest, cut four boards (90 mm x 19 mm) to 2m long. Attach them to the backrest frame, starting at the bottom and working up, leaving 3–5 mm gaps for ventilation, securing with 50 mm screws at each vertical support.
  • Ensure the seat and backrest boards are flush with the frame’s edges, trimming any overhang with a saw for a neat finish, creating a seamless look for your Auckland deck.
  • Test the bench by sitting on it—ensure it feels comfortable and stable, adjusting screws or supports if needed to eliminate any flex or creaking, ensuring a durable build.

Installation Tip: Use a spacer (like a 5 mm piece of scrap timber) to maintain consistent gaps between boards, ensuring proper drainage and a professional appearance.

5. Sand, Stain, and Seal for Weather Protection

Finishing the bench protects it from Auckland’s weather, ensuring it remains safe, durable, and stylish for years to come.

  • Sand all surfaces of the bench with 120–150 grit sandpaper, smoothing rough edges and removing splinters, especially on the seat and backrest where users will make contact, ensuring safety and comfort.
  • Wipe away sanding dust with a damp cloth, ensuring a clean surface for staining or sealing, preventing grit from getting trapped under the finish, a key step in Auckland’s dusty conditions.
  • Apply a weatherproof wood stain or sealant (e.g., Resene Woodsman) using a brush or roller, following the grain of the timber. Choose a colour that matches your deck for a cohesive look, ideal for homes in Remuera.
  • Allow the stain to dry for 24–48 hours, applying a second coat if needed for extra protection against Auckland’s UV rays and rainfall, which can degrade timber over time, per NZS 3640 (Chemical Preservation of Timber).
  • Inspect the bench for any exposed screws or sharp edges, covering screws with wood filler if necessary, and sand again lightly to ensure a smooth, safe finish for users.

Finishing Tip: Apply the stain on a dry day with no rain forecast, as Auckland’s sudden showers can ruin the finish, requiring you to sand and reapply, delaying your project.

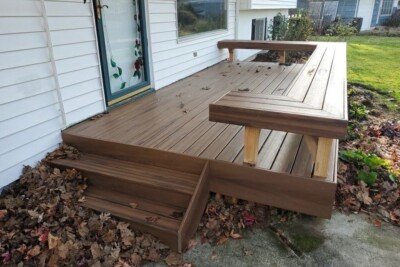
By following these steps, you’ll build a deck bench that’s sturdy, comfortable, and ready to enhance your Auckland deck, providing a cozy seating area for years to come.

Design & Safety Tips

A well-designed deck bench is both functional and safe, enhancing your outdoor space while ensuring durability in Auckland’s climate. Here are some tips to elevate your build:

  • Add armrests or storage under seats:
    • Install armrests by attaching 90 mm x 40 mm timber pieces to the backrest supports, positioning them 200–250 mm above the seat for ergonomic support, perfect for long chats on a North Shore deck.
    • Create storage by building a hinged seat or leaving the underside open for baskets, ideal for storing outdoor cushions or gardening tools, a practical feature for Papatoetoe garden enthusiasts.
    • If adding a hinged seat, use galvanised hinges and ensure the seat boards are securely fastened to the frame to support the added weight, meeting NZS 1170.1 load requirements.
  • Ensure no sharp edges or exposed screws:
    • Sand all edges and corners of the bench, rounding them slightly to prevent splinters or injuries, especially important for families with children in Mount Eden homes.
    • Countersink all screws and cover with wood filler or matching stain to create a smooth surface, ensuring no exposed metal that could cause injury or rust in Auckland’s salty air.
    • Double-check the backrest and armrests for protruding screws, filing down any sharp points to ensure a safe, user-friendly bench, per NZ Building Code Clause F4 (Safety from Falling).
  • Use galvanised or stainless fasteners in NZ climates:
    • Opt for galvanised or stainless steel screws, brackets, and hinges to prevent corrosion in Auckland’s humid, salty environment, particularly in coastal areas like St Heliers.
    • Apply a rust-proofing spray to metal components after installation for extra protection, ensuring they last longer in Auckland’s challenging weather, where rust can set in quickly.
    • Ensure all fasteners meet NZS 3604 standards for wind loading, guaranteeing the bench can withstand gusts in exposed areas like the Waitakere Ranges.
  • Consider comfort and aesthetics:
    • Add outdoor cushions or seat pads for extra comfort, choosing weather-resistant fabrics that can handle Auckland’s rainfall and UV exposure, enhancing the bench’s appeal.
    • Stain the bench in a colour that complements your deck—natural tones for a classic look in Ponsonby villas, or bold colours for a modern vibe in Albany homes.
    • Ensure the bench’s height and depth are ergonomic (400–450 mm high, 400–500 mm deep), providing a comfortable seating experience for all users, regardless of age or size.
  • Check for stability and load capacity:
    • Test the bench by sitting on it with multiple people to ensure it can handle the weight without flexing or wobbling, meeting NZS 1170.1 live load requirements (2.0 kPa).
    • If the bench feels unstable, add extra legs or diagonal bracing to the frame, ensuring it can safely support users during gatherings, a key concern for elevated decks in Titirangi.

Design Tip: Add a small shelf or ledge on the backrest for placing drinks or plants, creating a multifunctional bench that enhances your deck’s usability and charm.

These tips will help you build a deck bench that’s safe, stylish, and tailored to Auckland’s unique environmental challenges, ensuring a lasting addition to your outdoor space.

FAQs About Building a Deck Bench

What’s the ideal height for a deck bench?
The ideal seat height is 400–450 mm (16–18 inches), similar to a standard chair, with a depth of 400–500 mm for comfort. Backrests should be 350–450 mm high for good support, suitable for Auckland decks.

Can I build a deck bench without fastening to joists?
Yes, but it’s less stable. Fastening to joists ensures the bench can handle weight and wind, per NZS 3604. If joists aren’t accessible, secure the legs to the deck boards with long screws, ensuring a firm hold.

Do I need council approval for a bench addition?
Under Schedule 1 of the Building Act 2004, a bench under 1.5m high typically doesn’t require consent. However, if it alters the deck’s structure or exceeds site coverage limits under the Auckland Unitary Plan, check with Auckland Council.

What type of timber should I use for a deck bench in Auckland?
H3.2-treated pine is affordable and durable for Auckland’s wet climate. Kwila offers a premium, rot-resistant option, while composite decking is low-maintenance, ideal for coastal areas like St Heliers.

How long will a deck bench last in Auckland’s climate?
A well-built bench using treated timber and galvanised fasteners can last 15–25 years with proper maintenance (e.g., resealing every 2–3 years). Regular care ensures it withstands Auckland’s UV rays and rainfall.

Conclusion

A built-in deck bench adds style, comfort, and value to your outdoor space, transforming your Auckland deck into a cozy spot for relaxation or entertaining. By following this step-by-step guide—measuring the layout, building the frame, attaching the legs, installing the seat and backrest, and finishing with sanding and sealing—you can create a sturdy, stylish bench that enhances your backyard’s functionality. Design and safety tips like adding armrests, ensuring no sharp edges, and using corrosion-resistant fasteners will help you achieve a professional-quality result that withstands Auckland’s challenging climate, from heavy rain to intense UV rays. While this project is perfect for confident DIYers, complex designs, elevated decks, or council compliance issues might call for expert help. My Homes Construct Ltd specializes in custom decking solutions, ensuring your deck bench is built to the highest standards with lasting durability.

📞 Contact the Experts
From basic upgrades to custom decking—we’re Auckland’s deck pros!
📞 Call My Homes Decking Experts: 022 315 8987
📧 Email: info@myhomesconstruct.co.nz

Ready to upgrade your deck? Call us today for a free consultation and let us help you create the perfect deck bench for your Auckland home!

Facebook
Twitter
LinkedIn
WhatsApp

Read More Blog's

Do You Need a Permit to Build a Deck in Auckland?
06Apr

Do You Need a Permit to…

Do You Need a Permit to Build a Deck in Auckland? Introduction Imagine a warm…

Does Building a Deck Add Value to Your Home? Insights for Auckland Homeowners
26Apr

Does Building a Deck Add Value…

Does Building a Deck Add Value to Your Home? Introduction Outdoor living has become a…

Eco-Friendly Decking Options for Sustainable Living in Auckland
13May

Eco-Friendly Decking Options for Sustainable Living…

Eco-Friendly Decking Options for Sustainable Living in Auckland Introduction Auckland is buzzing with a growing…